Since every slicer software has its own special features, I will also go into the general slicer tricks here. You can use these on all known slicer programs. I show you here how with small changes to the parameters, you can optimize your printed object and get the best out of them.
1.Using the expert settings
What I would definitely advise you to do is to look into the expert settings of the different slicer programs. Even if all the different parameters seem a little daunting at first, you can use them to fine-tune your print much more accurately. Practice a little, print test models and look at the changes. You will notice after a short time that it looks more complicated than it is in the end, because often helpful explanations can be found in the slicer programs.
2.Preview the print
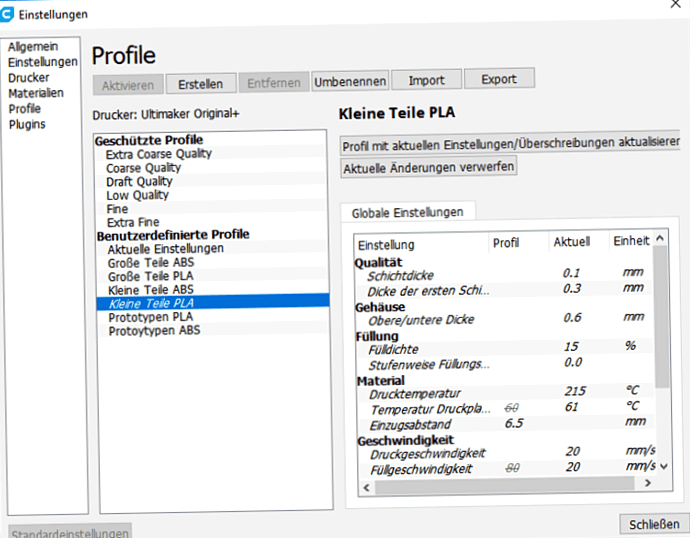
A really helpful tool in the slicer programs are the so called view options. Here you can, for example, display your model in the printable layers, and thus view your workpiece layer by layer. This view won't tell you exactly if the 3D print is working, of course, but it will give you a chance to see if you've made any obvious mistakes, or if you've made any mistakes at all. Whether there were any problems with the slicing process.

(Image:Here you can see very well how your model is built and which structures your 3D printer wants to print.)
Slicing –
The secret of 3D printing
Compact e-book on the subject of slicing!
3.Create different print profiles
Not all 3D printing is the same . If you already have some experience, you will have noticed that you have to adjust the slicing settings to your model. Even if the previous workpiece worked perfectly with the settings, it is not a guarantee that the next one will be the same. Create different print profiles so that you can benefit from your experience. These profiles should be sorted for example by material, quality or size of your printed models. This can be extremely helpful for future printing projects and you can avoid some misprints.
4.Keep the heat bed temperature low
Due to the heat emitted by the print bed, the adhesion of the workpieces is improved. Warping is also minimized, but excessive heat can cause new problems. So the adage "less is more" applies here. Try to keep the bed temperature as low as possible so that there is no deformation of the bottom layer. If you have set the temperature too high, you can see a kind of "cave" under the first layer. You have to find a healthy balance between good adhesion and no deformation of the ground. The heating bed temperature is usually written on the filament spools of the manufacturer.
5.Adapt the layer thickness to the model
Normally, the smaller the layer thickness, the better the quality of the model. But this is not always true and the complexity of 3D printing does not always do justice to this statement. For example, smaller 3D models can quickly overheat and cause deformation of the model if the layer thickness is low. Another disadvantage with thin layers is the compensation of material defects. In this particular case the diameter of the filament is meant. If there are extreme differences, you will see this with thin layers, rather than with larger ones. Perhaps the most common disadvantage of the thin layer is crossing voids. Since only a tiny amount of plastic is extruded in these layers, this thin strand is also more likely to break. The typical failure pattern for this problem can be found here .
6.Slow Printing
Of course, everyone wants their prints to be of high quality, but most of all, they want it to be fast. But this is not the right approach in 3D printing. Let the 3D printer build up your model layer by layer, so that these layers bond together optimally. The higher the printing speed, the more difficult it will be for your 3D printer to keep the contour points. My best experiences were made with a printing speed of 30mm/s to 50mm/s. Furthermore, you should also pay attention to the speed of movement. Choose them wisely, otherwise the positioning can be a real problem for the 3D printer. Here I take 80mm/s to 120mm/s.
7.Increase wall thickness
A very simple trick to increase the stability of your model is to increase the wall thickness. Not only that your model is more stable, also the error of the so-called" Ghosting" you can avoid. It should be said, however, that more material is needed and that the pressure duration increases.
8.Optimize the position of the workpiece
Try to align the position of your workpiece so that it is "easy" to print. This means that you avoid, if possible, large overhangs and areas that are free in space. Also, the first layer should have a large contact area with the print bed, as it is the foundation of your 3D print. What should also be mentioned is that most 3D printers have a much higher resolution in the Z-direction than in the X and Y-direction. So if you want to realize fine details in printing, it is better to align the workpiece in Z direction.