One of the most commonly used list structures numbers sub-items with 1.1 as well as 1.1.1 etc.
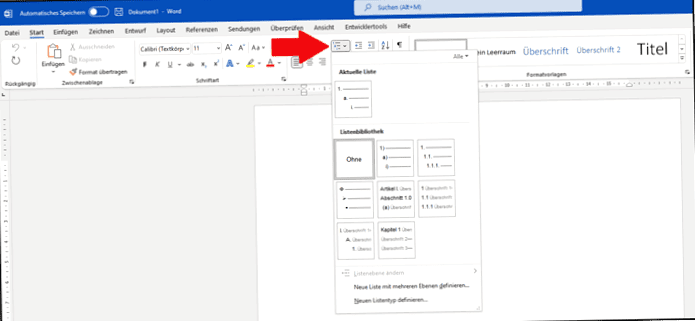
You can find this list by clicking on the "Multi-level list" icon in the paragraph group of the "Start" tab (see screenshot).
You can also (subsequently) use this list structure to automatically number headings, as long as you give them the right style (Heading 1, Heading 2, etc.).) assigned.
Click into a headline and choose the version of the 1.1-Numbering, in which a gray headline lettering can be seen behind each number.
Alternatively, you can use the instructions below to create a list with any numbering and format it as desired.
Create and format a new list with multiple layers
Click on the "Multi-level list" icon in the paragraph group of the "Start" tab. Then click on "Define new list with multiple levels…" at the bottom.
If you want to convert an already existing list, mark it beforehand.

Tip: If you want to change something in the list later, click with the cursor into the list or mark it and click again on "Define new list with multiple layers…".
If you want your list to be permanently saved as a style sheet and available to you in Word in the future, click on "Define new list type…" instead. Then at the very bottom, check the "New documents based on this template" checkbox. Then click on the "Format" button in the bottom left-hand corner and then on "Numbering.
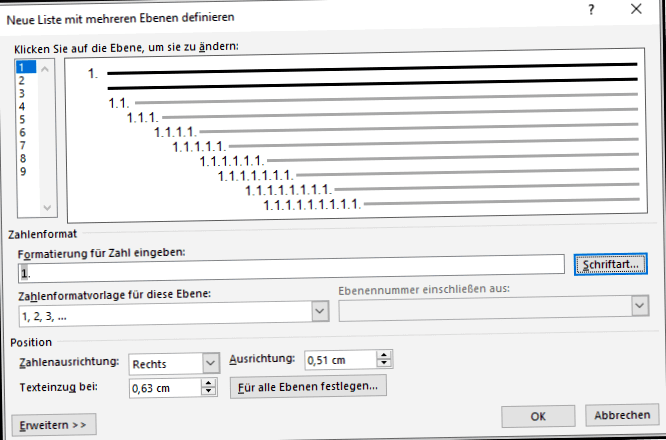
Both procedures lead you to the window shown below. Here you can make different settings for each layer of the list, which are described further below.
First select the list level on the left that you want to format. After you have made the desired adjustments for all layers, confirm with "OK".
The created list can be found by clicking on the "Multi-level list" icon in the menu bar again.

When creating a list with multiple layers, the following formatting is possible:
Adjust numbering and enumeration format
Under "Number format template for this layer:" you can set the desired numbering format. Here you can choose between Arabic and Roman numerals, letters or enumeration symbols, among others.
Under "Enter formatting for number:" you can then define how the numbers/letters/symbols should be displayed in the list. Characters that you enter here additionally will be displayed unchanged for each numbering of the respective layer.
You can change here e.g. put a dot, a bracket, a space or a hyphen behind a number or display the word "List item" in front of each number. It's important that you either use the "Number style sheet for this layer:" to automatically enter the numbering into the field (see above) or keep the default setting and don't enter this part manually.
Under "Include layer number from:" you can specify from the second layer onwards whether the numbering of previous layers should come before the current numbering (e.g.B. 1A, 1B etc.).
Customize font size, font color and other text formatting
Click on the "Font" button to open the corresponding window. Here you can change the font, font size and font color of numbering/enumeration characters or apply formatting like bold and underlines.
In the "Advanced" tab you can set the character spacing.
Adjust indents, spacing and text alignment
Under "Number alignment" you can specify whether the list should be left-aligned, right-aligned or centered.
In the "Alignment" field you can specify the distance of the list items from the page margin. If a list level should not be indented and should be on the same level as the rest of the text, enter 0 here.
Under "Text indent" you can set the distance of the text behind a number/ bullet from the page margin.
With a click on the button "Set for all layers…" the selected indents can be applied to all layers of a list and an additional fixed indent can be set for each subsequent layer.
Advanced settings
Click on the "Expand>>"-button in the lower left corner to enlarge the window. Here you can make further settings. At "Start with:" you can select e.g. define that a list does not start with 1, but with a different number. In addition, the count can be restarted after a selected level.
Numbering of headings – Link list with style sheets
The multi-level list can also be used to number all headings in a document.
Make sure that you assign the correct heading level to all headings in your document using a style sheet. Use the styles "Heading 1", "Heading 2" etc.
Click for it into a paragraph and/or. into a heading and select the desired template in the Styles group of the Start tab.
Create a list with several levels as described in this article and configure them as desired.
Select level 1 and click on the "Expand>>"-button to enlarge the window. Select the style "Heading 1" at "Link to style:". Then switch to level 2 and select the "Heading 2" style here. Repeat this step if you use more heading layers.
After you have confirmed the list creation with "OK", all headings in your document should be numbered in the style of the created list.