In some places you can read in the net about Blender as a VFX alternative to After-Effects. Blender can do VFX effects but it’s not meant to be an AE alternative. Blender still offers many and good functions to edit and publish his videos.
When it comes to VFX software, there are only a few full-featured alternatives besides Adobe After Effects, and they’re expensive. VFX simply means Visual Effects and are added to a movie afterwards. Because of its diversity VFX effects can be created in Blender (particles etc.).) and then edit it in the Blender Video Sequencer (VSE – Video Sequence Editor), but the concept and approach is quite different from what users expect from After Effects for example. But that does not matter. So much only in the margin to appropriate software tips in the net.
Videos with and without soundtrack
In the example image below two Video Sequencer windows are open. The upper area is used to preview an imported movie clip, the lower area shows the audio track (top) and the video track (bottom). All the following steps are also possible with audio tracks. For the sake of clarity, however, there are no audio tracks in the next steps. Notes on sound tracks are noted, however, if necessary.
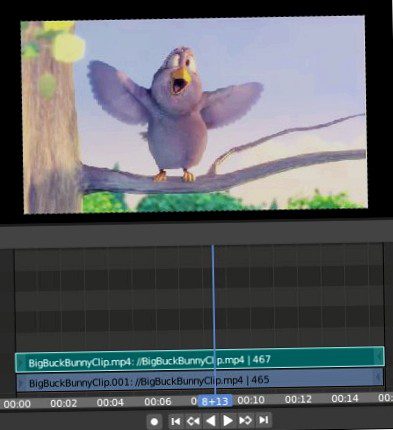
Image and sound track, preview area above
The sample image shows an excerpt from the animated movie Big Buck Bunny from 2008 by the Blender Foundation – Open education.telefony-taksi.rus.
Load videos (with and without audio)
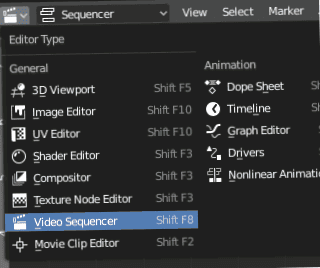
There are two ways to prepare Blender for video editing. The first way is to start Blender and open the editor (incl. Backdrop) under File – New. window constellation) (see picture below).
Open Video Editing
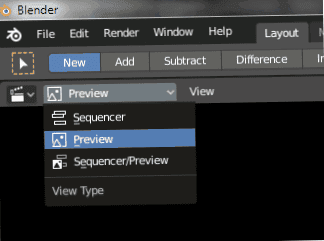
The second way is to start Blender as usual and open the Video Sequencer instead of the normal 3D viewport (see image below).
In both cases a video file is imported via Add or with the shortcut SHIFT-A. In case of a video with sound, the sound track is opened at the same time and displayed as a separate track above the video track (see animation below).
Add Movie (and/or Sound)
The option Backdrop marked in the picture above would show a preview in the background directly in the same editor, in addition to the tracks. You can do this if you want! An additional window is often more practical. More about this in a moment.
In the selection window you navigate to your movie files and select the part or parts you want to edit. You can get a thumbnail preview by activating the corresponding button (see image below).
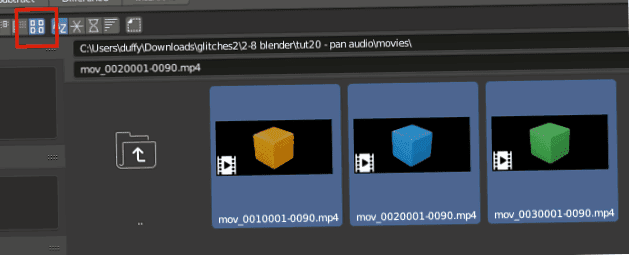
Clip selection with preview
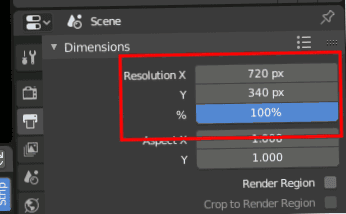
After that you should make the settings for the output size of the later movie. The size corresponds to that of the imported movie clips (see image below).
Above the Sequence Editor you can now open another window and open another Sequence Editor with the Preview setting. This window then shows a preview of the later movie. This second window can be more practical than the backdrop mentioned above (see image below).
Video Sequencer on Preview
The three movie clips imported in this way are now next to each other. Above you will find the Preview. Below the video sequencer is the timeline (see image below).
State of affairs
Instead of the movie clips you can also load whole frame sequences into the sequencer and render them as video.
Move clips
Since the three parts are individual video clips each part can be selected and grabbed and moved with shortcut G (see animation below).
Move with shortcut G
Using the shortcut N you can open another palette with settings on the left side, from which you can get information about the single parts. For example, the playhead is currently at position 1, the first frame. The length (Length) of the first marked clip is 90 Frames. Opacity is 1.000 (100 %) and the original dimensions are 720×340 pixels (see image below).
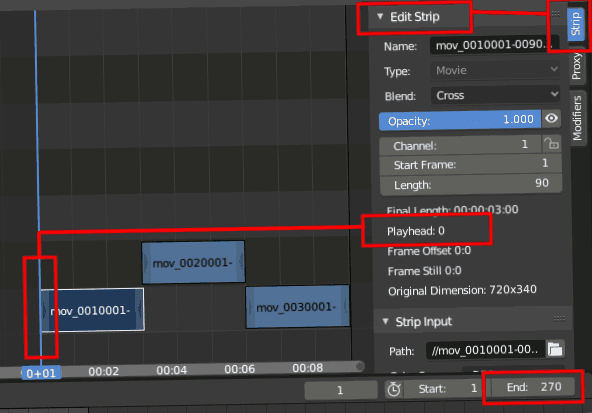
Information about part 1
If clip 2 is marked you get the information that clip 2 starts at frame 90 and the playhead (blue bar) is at -89. Seen from the view of clip 2 this is correct (see picture below).
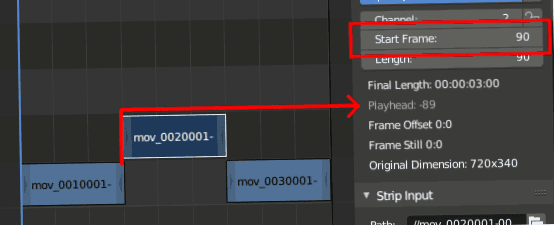
Clip 2 Information
Confusing can be here at the beginning, that here is counted like a machine does and that does not start with a 1, but is counted from 0 onwards. So always calculate one more, then everything is correct.
If clip 3 is marked the playhead (blue bar) is at position -179. This is also true, because the first clip is 90 frames long, just like clip 2 and that makes a total of 180 frames. So from the point of view of clip 3 -179 frames removed (see picture below).

Removal of Clip 3 to Playhead
Copy clips, cut, group, handles
With clicks in the middle of a clip, the sections can be marked and moved as desired with the G key. But if you click on the ends of the clips, new handles appear, which can be used to scale the clips (see animation below).
Mark Clip or Handle
If you press SHIFT-D in Blender as usual, clips will be duplicated and can be moved as well (see animation below).
Copy clip (SHIFT-D)
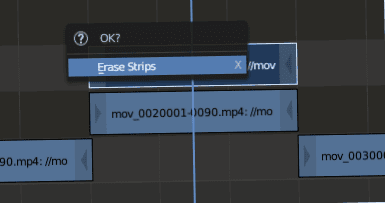
And the shortcut X for deleting also works in the Video Sequencer (see picture below).
When cutting you have the choice between a soft and a hard cut. A soft cut is made with key K at the position where the playhead (blue bar) is (see animation below).
And a hard cut is applied with the SHIFT-K shortcut. Both cuts are optically indistinguishable from each other. But there is an important difference between both cuts (see animation below)
Hard Cut – SHIFT-K
If you drag the outer left handle of the soft cut, the soft cut can be extended by images that are invisible due to the cut. Also with the hard cut the handle can be moved. However, the images here were cut at the cut and nothing can be recovered (see animation below).
Soft Cut – Hard Cut
Cutting also works including the audio tracks. In this case both tracks are marked and can get a soft or hard cut. Video and audio track can also be edited independently in this way.
If you want to join two parts together, for example to move them together in the future etc., then both parts can be selected one after the other and grouped with the shortcut CTRL-G (see animation below).
Group Strips (CTRL-G)
With the TAB key you can enter a group and edit it again. When entering the group you leave the common view and are only in the grouping. The grouping can also be left again with the TAB key.
Entering and leaving groupings
So much for the basic handling of strips (movie clips) in Blender. Other editing options are transitions of single parts, changing the speed (slow motion, fast motion) and the like. There will be separate parts for this topic.