Drum programming is one of the most important skills in any music producer’s arsenal. The ability to sequence rhythmic patterns has been around since the early days of hardware drum machines, which became increasingly popular in the 1980s as a way to replace human drummers and push the boundaries of what was possible with drums.
Because modern music depends so heavily on rhythm, the ability to be a good drum programmer can make or break a music producer’s success. Humans are hardwired to recognize a good rhythm, even on a subconscious level.
Even if you don’t know how to describe it, you know when you hear a song with excellent drum programming.
Any good drum programmer will tell you that it’s the details that matter. A generic drum pattern with the same 808 sample pack that every producer and his mother used sounds boring and banal. However, taking the same drum pattern and spicing it up with unique samples, syncopation, envelopes and more can breathe life into it and add a new level of interest for the listener.
Join us as we dive into the secrets of drum programming and learn how you can use the techniques of the experts in your productions.
What is Drum Programming?
Let’s start by answering an important question,
What is drum programming?
I think of drum programming as drum composition. Instead of playing the drums live, you arrange them in a specific order.
Drum programming is different from synthesis in that you don’t necessarily create the samples or sounds you use to compose, although many producers incorporate drum synthesis into their programming methods.
Essentially, you create drum patterns that you can rearrange, loop, and create variations within them.
The importance of good drum programming
So what makes great percussion programming so, well, great?
It can be difficult to explain why we feel as connected to one drum loop as another, and the easiest way to put it into words is groove .
Music needs a groove. It’s hard to dance and move without it.
The foundation of almost every track you make should be a groove, unless it’s a weird, ambient, experimental track. It’s more than likely that you want to get people dancing and tapping their feet when they hear your tracks.
Fortunately, there’s no science here, and there are many approaches to finding a groove, whether you’re making a hip-hop track at 100 BPM or a drum-and-bass track at 175 BPM.
If there is no science to it, then the question arises,
How a groove is formed?
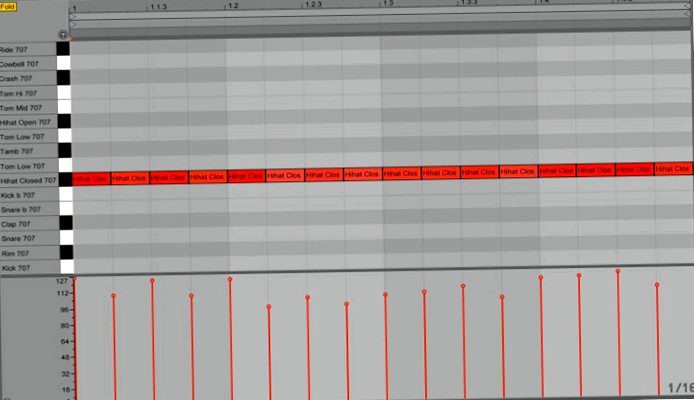
Basics of drum programming
To understand how the groove is formed, we first need to look at the basics of drum programming.
There’s a whole lot to be gained by breaking down a good groove and looking at its fundamentals. As I’ve already indicated, drums are the backbone of pretty much every modern composition. Until a producer is able to create a basic foundation, they will never be able to master the more intricate complexities of drum programming.
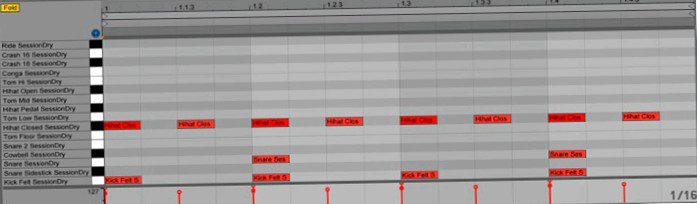
So let’s look at the different parts of a conventional drum groove and how they work together to form a rhythmic foundation.
Kick
The kick is the anchor for most drum grooves. From rock to hip-hop to house music, the kick is what keeps us on tempo. I often think of the kick as the most rigid percussive element.
When programming, I often prefer to keep the kick “on the grid” than other percussive instruments.
A kick has more of an ability to define the sonic characteristics of a track, e.g. a genre or style.
Backbeat
The first thing a producer is likely to put over a kick drum loop is the backbeat.
The backbeat or “Two and Four” the drumbeat is usually performed with a snare drum or a clap. It takes on the role of the primary form of syncopation, providing momentum and energy to better define the groove of the drum pattern. In a moment we will discuss how you can use the backbeat to manipulate your backbeats and make them sound a little more human.
Cymbals
Cymbals are the upper register instruments in a traditional drum kit. A sixteenth note or offbeat hi-hat pattern can add energy to a drum pattern, while crashes and other cymbals can help define different sections of a track and add dynamics.
I often use other high frequency rhythm instruments in this category, such as e.g. Tambourines and Shakers. You can add oomph and texture to otherwise conventional grooves with these additional percussion instruments.
Percussion sounds
After shakers and tambourines, there are more percussion pieces that can add syncopation, create layers, and add unique textures to your basic drum patterns. The beauty of percussion in the world of drum programming is that it gives you the most freedom in sample selection and placement.
There are so many different types of percussion instruments, from bongos to triangles to woodblocks to marimbas and more.
The important thing here is to choose high-quality samples that feel coherent, add dynamics, and fit with the rest of the groove.
Consider using loops
Whether you’re just starting out or reading this article for a refresher, you’re probably familiar with the stigma of using loops in music production.
I find this stigma ridiculous.
A sampled loop can be a great tool for adding complexity to your drum programming while also creating a human feel.
I also find sampled loops very helpful in getting familiar with the combination of audio and MIDI. Even if you don’t use them in your final mix, a good loop can spark your creativity and get the production process going.
If you refuse to use loops because you’ve heard that they have a bad stigma attached to them, you’re just putting an obstacle in the way of your workflow.
Go beyond the conventional
After you’ve familiarized yourself with the basics of drum programming, you can tap into the more complex intricacies of the art by adding syncopation, unique patterns, or nuanced details to bring your drum groove into the upper echelon.
If you’re starting out with conventional drum patterns, this can certainly be beneficial, but at some point you should consider more unconventional approaches to drum programming to make your tracks stand out.
Syncopation
I recently wrote an article about syncopation that might help you dig deeper. In this article, however, I’d like to briefly discuss syncopation and how it can open more creative doors for you and help you work from an unconventional point of view.
Backbeat
Backbeat syncopation has been around for about a century now. We’re so used to it in modern music that it’s hard to believe it hasn’t always been a basic style of syncopation. Backbeat syncopation emphasizes the two and the four instead of the one and the three where the kick traditionally sits.
By editing a standard backbeat, you can give it energy, momentum, or other characteristics you need to get the feeling you want.
Offbeat
Offbeat syncopation is used to emphasize a different pulse that is outside of the traditional downbeat pulse. We often use cymbals and percussion elements to create offbeat syncopation. If you listen to any house track, you’ll probably hear offbeat syncopation in the hi-hats. The hi-hats often sit on top of the “and” between the 1-2-3-4 count – 1 and 2 and 3 and 4.
Suspension
Suspension syncopation can provide a strong accent by holding or overlapping a measure with an element from the previous measure. This type of syncopation is unique in that it upsets our traditional expectations of rhythm, creating a kind of cascading effect that blends beats together and makes arrangements seem less rigid.
Missed beat
This type of syncopation is one of my favorites because it puts the emphasis on places you wouldn’t expect it. Missed beat syncopation can be used to create strange and weird drum grooves where the listener is expecting drum or percussion hits that never arrive or arrive a little earlier in the drum pattern than they expect.
You’ll often hear this in trap music, when a producer places a kick drum in a place where the listener wouldn’t expect it, to create anticipation or tension.
Drum envelopes
An important element of programming that not many producers talk about is the space between hits. Space or emptiness are such important concepts in music – concepts we need to realize in our production.
Keep in mind that most mixdowns will never sound coherent without a little EQ and compression. In the same way, most drum grooves don’t sound their best without a little envelope manipulation.
For example, if you place long percussion elements in a fast groove, you will notice a noticeable drag. A really long, drawn-out snare drum sample in a 160 BPM drum groove can make the track feel sluggish or detached.
Fortunately, most modern DAWs have samplers that allow us to manipulate the ADSR envelopes of samples, so we can choose tighter or looser grooves to create the right space in our drum arrangements.
In a fast track, you might shorten the sustain of a kick drum so it doesn’t overlap with other samples. In a slow track, on the other hand, you might increase the sustain of the same kick so that it fills the empty space between the main beats.
Not only can this help your grooves sound tighter and more confident, but it can also give your grooves more headroom without overlapping multiple samples.
Melodic Percussion
Not many drum programmers talk about melodic percussion, although it can be so much fun to establish central hooks without having to resort to traditional melodic instruments like synthesizers, keyboards or guitars.
Using melodic percussion to take on the role of the melodic hook in your song can provide a unique and interesting layer to your groove. There are a few methods I like to incorporate into my tracks in this regard, but the most important thing is to look for pitched percussion instruments.
There are many percussion instruments that have a tonality to them, such as e.g. Steel drums and marimbas, which you can shape into your own melodies. The important thing is to match these melodic percussion instruments to your track, so you can use them to create simple melodies and riffs.
Even if you don’t use pitched percussion instruments for standalone melodies, you can use them for calling out rhythmic patterns, for question-and-answer patterns that reflect specific melodies or phrases in your track, or as layers for lead parts like vocals or synth melodies to increase overall energy.
While pitched percussion sounds can be very useful in almost any genre, I often find them most useful in genres like techno and house. When people dance, they often don’t pay as much attention to the subtleties of the melody as they do to the drum beat of the track. Pitched percussion can provide a more subtle approach to creating melodies.
How to make your drums sound realistic
One of the most difficult aspects of programming “Live-Drums is to make the programmed drums sound realistic.
Giving your programmed drum grooves a human feel makes them more palatable to the listener and more exciting to listen to overall.
Now let’s look at some ways you can turn your digital drum patterns into realistic sounding drum grooves.
Being a drummer
One of the simplest, but most important aspects of programming realistic drums is to think like a real drummer.
Of course, it can be exciting to go over the top with eccentric or otherworldly rhythms, but if you want to have realistic drums, you need to make sure that every drum or percussion part you write can be played by a real drummer.
If you are programming a drum part that is beyond the scope of what a real drummer could play, it is obvious that you are using software.
I can’t think of any drummer who can play a 64th note hi-hat groove at 150 BPM, although there are many drummers who can play a simple four-on-the-floor rhythm at the same tempo.
To know what a real drummer can and can’t play, you have to listen carefully to real drummers. Listen closely to some of your favorite songs and pay attention to the drum grooves they use to get an idea of what is realistic.
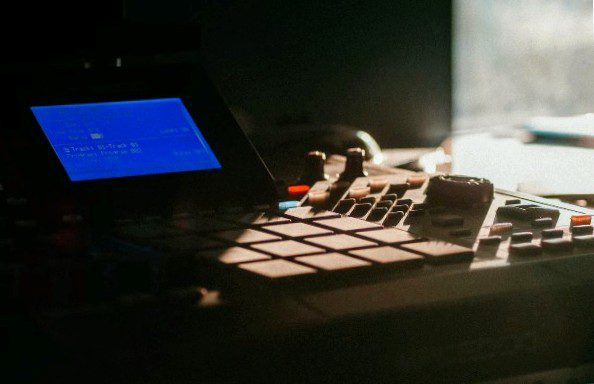
Use a MIDI instrument
If you program a drum kit that has a consistent volume throughout and is perfectly in time, it’s pretty obvious that you’re using software.
An easy way to counteract this and make your software drums sound more realistic is to use a MIDI controller. Maybe you’re a drummer who doesn’t have the ability to record live drums. Then you could use an electronic drum kit instead and integrate it with your drum software to play your grooves in real time.
I often do this when using the Addictive Drums 2 software, as it gives me a realistic feel without having to make many adjustments.
If you’re not a drummer, you can also use a MIDI keyboard or drum pad.
Regardless of the hardware you choose, creating drum patterns with a MIDI controller will make your track sound much more realistic by varying timing and velocity.
However, you can get the same results without a MIDI controller, even if it requires a little more effort.
Don’t go crazy with quantization
Ask any drummer, and they’ll tell you how important it is to focus on timing.
But even the best drummers in the world are not robots. Record a real drummer, and you’ll find that some notes will be slightly off the grid in your DAW. The constant push and pull is what creates a realistic rhythm.
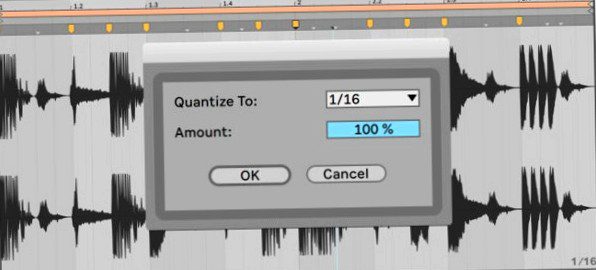
In most DAWs these days, we have the ability to quantize MIDI notes to lock them into the grid. If a note isn’t perfectly in time, you can use quantization to snap it to the rhythmic grid.
While quantization can be helpful in tightening up a groove, if you overdo it with quantization, your tracks can sound robotic.
If you’re hand-programming, make sure some of the notes are slightly off the grid so they sound realistic. You can start by quantizing the entire drum groove to fix it before going through the pattern and adjusting the notes either before or after the beat.
Whether you place the beats behind or in front of the beat depends on the track. If you want your drum groove to sound more energetic, you should place the beats slightly ahead of the grid. On the other hand, if you want your drum groove to sound more sluggish, place the beats behind the grid.
Note that many DAWs have different quantization settings that allow producers to decide how much they want to tie their hits to the grid. Lower quantization levels make grooves sound more realistic, while higher quantization levels keep elements on the grid.
Adjusting the speed
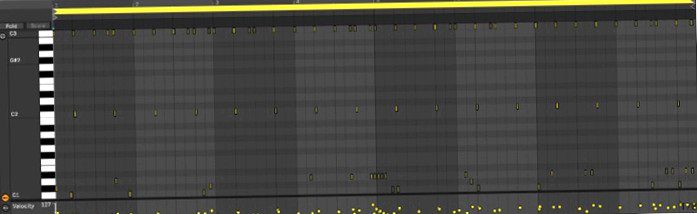
Another important element in making your drum grooves sound more realistic is adjusting velocity.
All MIDI notes have a velocity that describes how loudly a sample is triggered.
A note with high velocity sounds louder and more intense, while a note with low velocity sounds soft and quiet.
You can accentuate certain beats in your grooves by changing the speed of the notes they contain. Again, think like a drummer. A drummer will emphasize beats he considers most important by hitting them harder.
For example, a standard punk rock groove has an accent on the two and the four of each measure, while a one-drop reggae groove has an accent on the one.
As you play through and adjust the speeds, imagine how you would play the groove in real life.
I find it helpful to record yourself tapping to the drum groove to see which beats you naturally emphasize. You can then adjust the velocities in your MIDI groove to match the velocity changes in your recorded waveform.
Humanization
Many DAWs, such as e.g. Logic and Ableton, have “Humanize”-Functions that easily adjust the timing and velocity of notes. The Human Eyes function is a wonderfully efficient way to make MIDI grooves sound less robotic.
However, care must be taken when using the Humanize function, as the best way to determine which notes to accentuate depends on feel. It can be difficult for a computer to assign speeds and timing inconsistencies based on feel, and if you arbitrarily assign these little nuances, your MIDI drums can sound even less realistic.
YouTuber Joshua Casper posted an excellent video showing how to use the Humanization feature in Ableton Live.
Using real loops
An easy way to add realism to your MIDI drums is to use pre-made loops.
I often find that combining programmed MIDI drums with live loops offers the best of both worlds in terms of control and realism.
If you are using a virtual drum instrument with pre-recorded MIDI grooves, such as. B. Addictive Drums 2 or Steven Slate Drums, you can use the MIDI loops as a starting point for your groove. These MIDI grooves were recorded by real drummers and arranged according to tempo and feel, so the ideal timing and velocity characteristics should already be in place.
You can then take the individual MIDI track patterns in these pre-made MIDI loops and use them in your session with different instruments. For example, you can take the snare drum pattern in the MIDI track and use it to trigger another sample, e.g. a rim shot or a clap.
You can also overlay your MIDI notes with live sample loops to add a unique layer to your drum groove. For example, I often find that realistic hi-hats are the hardest to program. I often supplement my MIDI hi-hats with real hi-hat loops to make them sound more realistic.
Use your own reverb
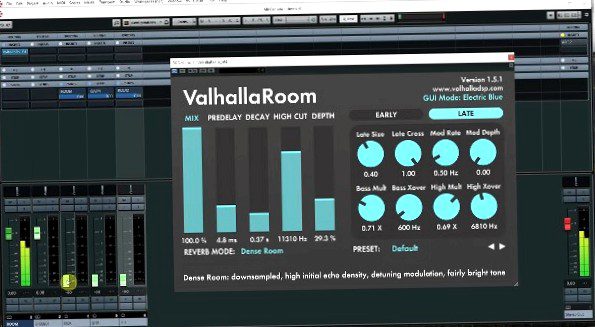
Many professional drum programs have built-in reverb.
Even if it sounds good on its own, I always find that too many different reverb types from different drum programs combined can make things sound disjointed. For this reason, I always mute the internal reverb or stop reverb to use a room reverb for my mix.
Once I have my entire drum groove programmed, I send each of the elements into this room reverb at different strengths. The idea is to make each element sound like it was recorded in the same room.
You can then adjust the various parameters of that room reverb to match the rest of your mix, e.g. the size, style, EQ, etc.
Add saturation
If you are programming drum sounds from a drum VST, you may need to add some saturation to keep the sounds from sounding too pristine. Saturation is one of my favorite effects because it adds natural artifacts that would also be present in a live recording.
While you can use a saturation plugin, e.g. a tape machine plugin, put it on your drum bus and that’s it, but I find that the parallel saturation gives you a little more control and allows you to set just the right amount of sharpness you need to get your drums through the speakers.
To do this, you can send your drum bus to an aux track with a saturation plug-in. Listen to the drums while turning up the drive on your saturation plug-in. The great thing about parallel saturation is that you can make the saturated aux track as dirty as you want, since you only want to subtly push it under the dry bus.
Think about what you’re missing in your drum bus, and try saturation to achieve that.
If your drum sounds are too thin?
If so, you should aim for more saturation in the low and mid ranges.
Maybe they sound too dark?
If this is the case, you should turn up the high-end to get an expensive shine.
Once you have a good tone set, you can turn the aux fader all the way down and slowly back up until you have a good combination of clean and dirty.
Adding fills
Once you get a pretty good groove going in the different sections of a song (verse, pre-chorus, chorus etc.), you can use fills to link these sections together. I often add fills every eight bars or so to break up the monotony of the drum groove and split a long section in half or segue into the next section.
It’s pretty easy to program simple fills into a groove. And if you’re working with a drum VST, you’ll most likely find an included fill library with tons of fill patterns to choose from.
To make your fill fit into your existing pattern, you need to make sure there are no elements that clash with the elements in the fill. If the added fill uses a snare, for example, you should remove the snare sample from the original pattern to give it some space. However, if you keep other elements in the pattern that don’t clash with each other, like e.g. B. Shakers or hi-hats, you can achieve a more coherent sound overall.
Once you’ve placed your fill in the right place, the next step is to get it right in the mix. The main focus should be to make sure that the velocities of the notes in your fill match the velocities of the same elements in the original sample. You don’t want the snare and your fill to be much louder or harder than the snare in the underlying pattern.
The last thing you need to do is quantize or shift the timing of the fill elements a bit to match the main drum groove. For example, if your main drum groove is curved, you can move the fill elements so that they are slightly behind the grid lines.
Find the best drum samples
You’re great at programming drum grooves and adjusting the various parameters of drum VSTs. However, if you don’t use the right samples, your mixes will still come out flat. Finding high-quality samples for your compositions is definitely one of the most important things you should pay attention to.
Selection of samples
There are so many great samples and sample packs that sound fantastic on their own. But just because a sample sounds incredible on its own doesn’t mean it will sound incredible in the context of your mix and the other samples around it. While you can definitely use mixing tools like EQ, compression, and envelope shaping to manipulate a bad sample, there are only so many ways you can go about it.
Also, trying to mix samples that don’t go together well right off the bat just makes more work for you.
You want your drum loops and samples to sound like they belong together from the first moment you hear them. Nothing can confuse a listener like discontinuity.
Although you might be tempted to grab the closest sample, taking the time to find the perfect samples will pay off big time in the mixing phase.
If you don’t have a sample collection yet, I recommend you check out Splice.
Tuning your drums
Technically, a drum is a discordant instrument, meaning it has harmonics that do not contribute to a specific pitch. However, most drums have a fundamental pitch upon which these discordant harmonics are built.
The interesting thing about tuning drum samples is that there is no right or wrong approach. However, it’s pretty easy to hear when the tuning of a sample doesn’t fit into the context of the overall drum groove.
One of the most important drum elements to tune is the kick drum, as a kick drum with the wrong root can clash with the bass and other low-end instruments, causing the mix to not sound coherent and clean.
This is more of an issue with genres like trap and hip-hop, where the majority of the track relies heavily on the 808. In genres with shorter kicks, it’s almost impossible to identify a specific pitch.
You can use a spectrum analyzer if you have trouble hearing the fundamental pitch of a drum.
Tuning drums can not only get you in the right mood, but can also give you a completely different feel to your playing. For example, lowering the pitch of a drum can make it sound fatter and softer. On the other hand, raising the pitch of a drum can make it sound more bitey and have more energy.
Experiment with tuning or transposing your drums and see if it makes them fit better in the context of your productions.
A step outside the genre
Consider using samples from non-traditional sample packs to create contrast in your grooves. For example, you could use some soft, supporting samples without hard transients to add some texture and air to your hard dubstep drums.
In the same way, you could layer a live hi-hat over your techno groove to give it more realism, or layer a digital kick over your live drum groove to give it more impact.
You can often find samples outside of genre-specific sample packs that can make your programmed drums sound much more interesting. Even if you’re a rock producer, don’t be afraid to use a punchy snare sample from a future bass pack.
Arrangement
Arrange the drums so that they build energy as the track progresses.
Even though you can stack 20 different drum elements to create a massive groove under the hook, that doesn’t mean you have to use that massive stack of elements for every hook in the track.
Consider a slow build, adding or introducing new elements in each section so that the final hook, chorus, or drop in your track provides the biggest energy boost. For example, you could save the energetic shaker for the last chorus.
Best software for programming drums
Addictive Drums 2
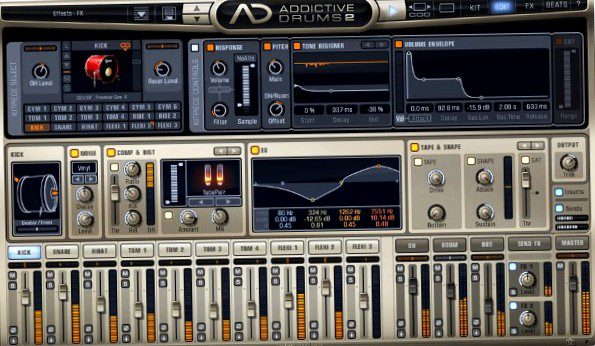
Addictive Drums 2 by XLN Audio has long been one of my favorite drum VSTs for creating realistic-sounding drums. One of the main highlights of this drum VST is that it includes a wide selection of incredible sounding drum kits and a huge library of MIDI grooves recorded by some of the most legendary drummers in the music industry.
One of my favorite kits is the Fairfax drum kit, recorded at Sound City in Los Angeles. With each drum kit, you get more than 130 presets that offer everything from clean and realistic to gritty and distorted.
While I appreciate the intuitive nature of Addictive Drums 2, as it’s easy for any beginner to get up to speed and create quality drum grooves, there are many detailed features that allow you to tweak each sound to your heart’s content. You get a 10-channel mixer for the various drum kit elements, as well as individual channels for the overheads, room mics and the bus.
In terms of processing, each drum element has individual controls for EQ, compression, saturation, transient shaping, noise content and more. You can even use the built-in reverb and delay to create a more three-dimensional drum sound.
Compared to other realistic drum VSTs on the music production market, Addictive Drums 2 feels the most immediate. Maybe I’m biased because I’ve been using it for so long, but even after all these years, the plugin still feels fresh and exciting.
Steven Slate Drums
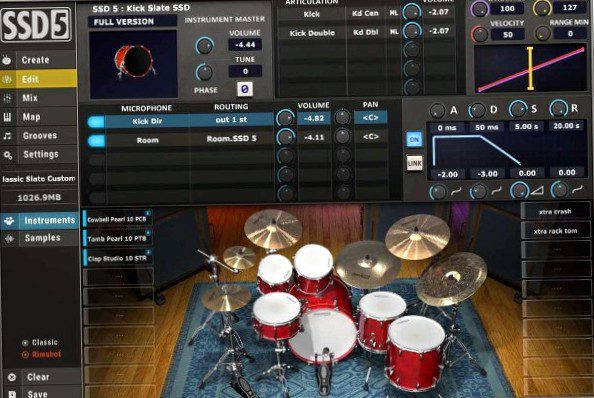
When you talk about legends in the world of drum sampling, you can’t help but mention Steven Slate. Its drum VST, SSD 5, offers an incredible collection of high-quality drum samples, including 112 kick drums, 135 snares, 58 toms, 14 crashes, 11 hi-hats, six rides and seven splashes/quinas.
Each sound has been compiled into one of 148 drum kit options, many of which are modeled after the legendary drum setups of various drumming legends.
Realism is the key to SSD’s success. Even with the original collection of drum samples from the first iteration of SSD, you get incredibly powerful and realistic drums that hold up in even the heaviest pop, rock, or metal mixes.
As with Addictive Drums 2, you get a wide selection of built-in MIDI grooves in a variety of styles, including rock, jazz, hip-hop, reggae, and funk. However, I would say that the overall sound of the plug-in is geared towards the modern rock and metal kit sound.
Battery 4
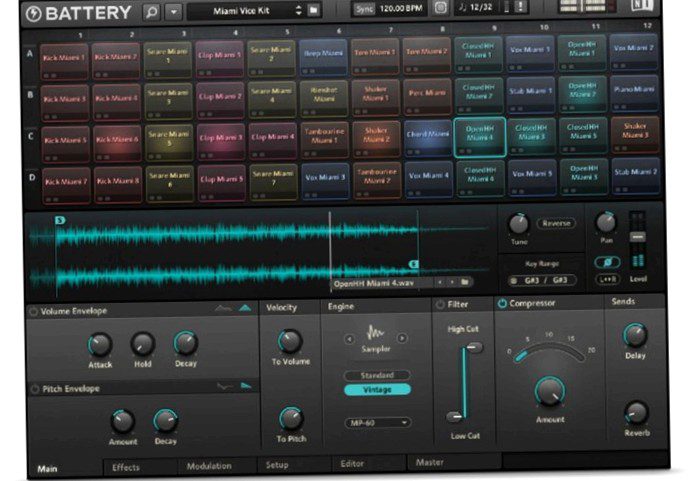
If you’re looking for a program to edit drum samples, Battery 4 from Native Instruments is one of my all-time favorites. It’s a real powerhouse of a sampler, with a sleek GUI and tons of professional samples to get you started.
The plugin clearly focuses on urban, electronic drum sounds, making it perfect for dance music, although it includes over 140 different drum kits that are great for just about any style of music. You’ll also find melodic loops and effects in these kits.
The interface is also unique: you get 128 cells into which you can load the included samples or your own samples, making them easily playable on your MIDI keyboard or drum pad. Each cell has individual ADSR, compression, EQ and modulation controls. You can also adjust the pitch, panning and much more.
I love the ability to import my own samples and chop, trim, invert or mangle them until they are almost unrecognizable.
The beauty of Battery 4 is that it can sound however you like, whether quirky, modern or vintage. It’s basically a blank canvas for programming drums in any way you can think of.
MT Power Drumkit 2
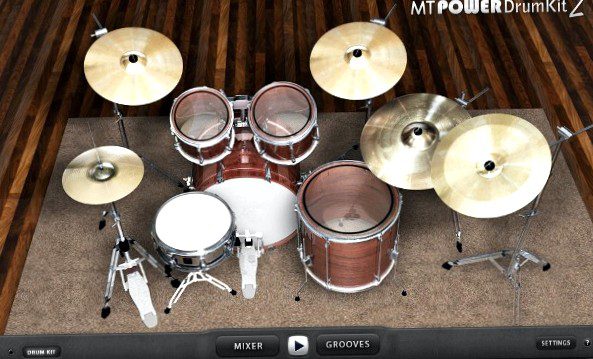
MT Power Drumkit 2 offers a great way to get started with software drums without spending a dime. This drum VST offers a set of solid and high-quality sampled acoustic drums with a pretty decent amount of editing detail to make the elements fit into your mix.
While you don’t have as much control as the VSTs mentioned above, the pre-processed nature of the sounds provides the perfect balance of realism and radio-ready feel.
It’s a very simple and intuitive drum programmer that gives you instant gratification no matter how you create drum patterns.
Get into the groove
Drum programming is an art form that many producers don’t pay enough attention to. Creating unique drum patterns requires hundreds of small decisions and variations that eventually culminate in a fresh and exciting groove.
I would also encourage you to get involved with nuance and complexity when programming drums. Don’t be afraid to make small adjustments that may seem trivial at first. In reality, it’s the accumulation of these track adjustments that end up making a big difference.
You can certainly spend months or years studying the technical aspects of drum programming, but it takes time to get good at it. There’s no way to describe the feeling you get when you find the perfect groove. You just know it. Listen closely to the songs of some of your favorite artists to see how they use certain samples or techniques we discussed above.
Sooner rather than later, you’ll be on your way to creating professional-sounding programmed drums.