
In the home office, we have all noticed in the last few years how important it is to have a stable and reliable internet connection. When videoconferencing, remote access to the company server and streaming are all running in parallel, the connection can sometimes go down the tubes. Between the bandwidth of the connection and the transmission of the WLAN, the router is the interface that regulates everything.
I'm not a plug and run guy (which it usually doesn't do anyway), but want to know what my devices are doing and like to configure myself. Mainly for privacy and blocking tracking and ads, but also to use exactly the features I want to have.
After many different routers I finally got stuck with OpenWrt. Unify has a very nice UI, but sometimes can't be configured sufficiently and intuitively, and occasionally sparks telemetry data home. Setting up a VPN easily was not possible and portforwarding to the adblocker had also caused problems.
OPNSense is open source and offers a lot of configuration options, but it's too much for me and needs more powerful hardware.
OpenWrt as alternative can be installed on many routers. It ran stable on my router for a long time, but the whole package was not round enough for me. With a VPN connection the speed was almost halved and the WLAN was not fast enough with the only open source drivers.
As an alternative I chose a Raspberry Pi, but you have to set it up yourself.
I use a Raspberry Pi 4 with 2GByte RAM as router. That is perfectly sufficient and this one is currently even still available. The version 4 has to be preferred to the 3B+ version, because the version 4 has a USB3 port and a 1Gbit Ethernet port.
Let's go !
First of all download the image of the corresponding Raspberry Pi from the OpenWrt installation page and flash it to SD card. It's easy with balena Etcher. As size of the SD card 16GB is sufficient.
Installation of the USB-Ethernet adapter#
Since the Raspberry has only one ethernet port you have to install the software to use a USB ethernet adapter as second output first. To do this, the Raspberry must be connected to the current home network as a client, in order to download the necessary software via the current router.
The adjustments are undone after the software installation and the Raspberry again from client to router.
Configure Raspberry as client#
Insert the SD card into the Raspberry, supply power and connect the computer via Ethernet cable. Once you got an IP address you have to connect to the Raspberry via the terminal to turn it from a router to a client. By default the RaspiRouter is connected via IP 192.168.1.1:
A password does not need to be entered for a fresh installation.
Two files need to be adjusted:
The Lan interface must be adjusted so that it does not output IP addresses. The line option ignore '1' must be added
To edit the file press i (instert).
This is how it should look afterwards:
1 2 3 4 5 6 7 8 config dhcp 'lan' option interface 'lan' option start '100' option limit '150' option dhcpv4 'server' option leasetime '24h' list ra_flags 'none' option ignore '1'
Press Esc to save, then :wq (write; quit)
Next, change the lan configuration so that it can be found in the network as a client and can access the internet:
The option ipaddr '192.168.1.1' adjust so that it is a free IP address in the current network. Maybe 192.168.1.10?
For the internet access the information for the gateway and a DNS server must be added. Mostly the gateway is 192.168.1.1. As DNS I use here Quad9: 9.9.9.9
1 2 3 4 5 6 7 8 9 config interface 'lan' option device 'br-lan' option proto 'static' option ipaddr '192.168.1. ' option netmask '255.255.255.0' option ip6assign '60' option delegate '0' option gateway '192.168.1.1' option dns '9.9.9.9'
After saving the changes restart the Raspberry with:
and connect to the current home network via Ethernet cable.
Connect the computer to the network and access the Raspberry with the changed IP address in the browser via Luci.
Log in without password.
This now or later via
System> Administration> Router Password
⚠️ Note: Adding the gateway and the DNS is mandatory, otherwise the Raspberry can't access the internet. I made the experience, that when omitting the DNS, the names can not be resolved, even if the primary router has configured a DNS.
Install the software#
After you can access the Raspberry via Luci you have to update the software list first:
system> Software> Update lists.
Now find out the appropriate driver of the USB-Ethernet adapter and install it. I had found the information in the manufacturer information on the Internet. My adapter has a Realtek 8153 chip. The driver fits to this
Create and configure the second LAN port (Internet)#
After the driver is installed, the USB-Ethernet adapter can be installed and configured as a second Ethernet port. I configured this adapter as WAN output.
Network> Interfaces> Add new Interface
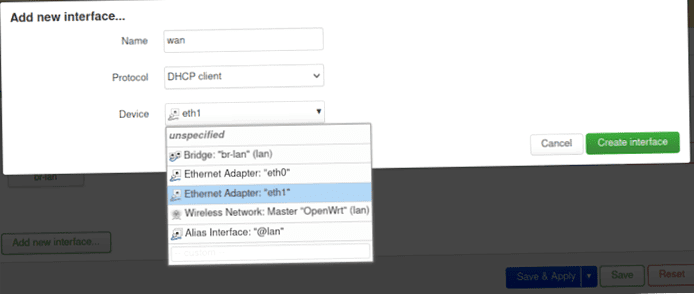
Apply the above settings.
Create the interface with Create Interface.
Afterwards set the firewall zone to wan:
Don't forget to save the change with :
Use as router#
The Raspberry now has two RJ45 Ethernet ports. The USB adapter is connected to the Internet (WAN) and the other one leads to the internal network (LAN).
But still the Raspberry is a client, which has to be undone again via the terminal. Everything that was configured above under Configure Raspberry as Client must now be deleted again.
ssh [email protected] (enter the IP address of the LAN here)
Enter the changed password if necessary.
Delete the line option ignore '1' again and then save it.
Change the IP address back to 192.168.1.1 change and delete the lines for gateway and DNS. Save. Ready. Reboot.
⚠️ Note: You can also do the changes under Luci. However, if you change the IP address of the LAN port under Luci, you must access this new IP address quickly after the change, otherwise the old IP address will be taken over after some time. Therefore it's easier to undo the changes via the terminal
Now the RaspiRouter is ready for use&.
Connect the WAN port to the modem. This is ideally in bridge mode. Connect the LAN port to the computer and connect it via 192.168.1.1 Access the router.
If everything worked, the router should have received an IP address of the modem through the WAN port. In my case it looks like this:
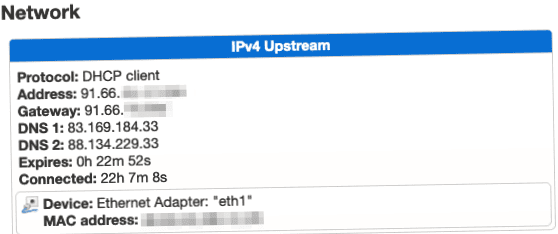
As it is, the Raspberry doesn't need much configuration. It runs quite safely, quickly and stably. Of course, it is worthwhile to set up and install a few things with such a power router.
Additional software and expansions#
I can still recommend the following software. Here I will expand the article from time to time in the course of time to give some tips and explain settings:
- Adguard Home
- Wireguard VPN
- SQM (Smart Queue Management)
- BCP38
- banIP
WLAN? Really….?#
I have not even switched on the WLAN of the RaspiRouter. It's not really suitable to provide multiple devices in parallel with enough bandwidth and there is only one interface, which sparks either in the 2.4 or 5Ghz band. I bought another access point at my trusted electronics retailer. There are newer ones with multiple antennas and Wifi 6. This way you are well prepared for the future and a large IoT network with separate VLANs.